

DIY Coffee Flavor Enhancement: 5 Creative Techniques
TL;DR:
- Proper tools and ingredient timing are essential to improve home coffee flavor and quality.
- Techniques like adding salt before brewing or honey after brewing can enhance taste and reduce bitterness.
- Flavor peaks 20-30 minutes after brewing; patience and proper timing optimize flavor experience.
You brew a fresh pot, take that first sip, and feel nothing. No excitement, no complexity, just a flat, slightly bitter cup that tastes exactly like yesterday’s. Most home coffee lands in this zone not because of bad beans, but because of untapped potential. The gap between a forgettable brew and a café-quality experience often comes down to a few deliberate, evidence-backed techniques. This guide walks you through the exact tools, ratios, timing strategies, and creative methods that turn an ordinary cup into something genuinely worth savoring. No barista certification required.
Table of Contents
- Essential tools and ingredients for DIY coffee flavoring
- Step-by-step flavor enhancement techniques
- Timing, temperature, and the ‘flavor window’
- Troubleshooting, common mistakes, and flavor verification
- What most guides miss: the true secret to memorable coffee flavor
- Elevate your coffee and tea experience with Variatea
- Frequently asked questions
Key Takeaways
| Point | Details |
|---|---|
| Salt reduces bitterness | A pinch of salt smooths harsh notes without making coffee salty, especially for over-extracted brews. |
| Honey enhances flavor | Using the right honey for your roast and adding it below 60C unlocks floral, fruity coffee notes. |
| Timing is crucial | Coffee flavor peaks 20-30 minutes after brewing at 55-60C, where acids and sugars are balanced. |
| Troubleshooting is key | Adjust ingredient ratios, brewing methods, and temperature to fix off flavors and optimize your brew. |
| Experiment for success | Experimentation and evidence-backed tweaks are essential for achieving café-quality results at home. |
Essential tools and ingredients for DIY coffee flavoring
Before you start experimenting, you need the right setup. Trying to enhance flavor without proper tools is like painting without brushes. You can get somewhere, but not where you want to go. The good news is that most of what you need is already in your kitchen or costs very little to add.
Core tools you need:
- Burr grinder: Produces an even grind size, which directly controls extraction and flavor consistency. Blade grinders create uneven particles that brew unevenly.
- Digital kitchen scale: Measuring by weight instead of volume gives you repeatable results every single time.
- Thermometer or temperature-controlled kettle: Water temperature affects how compounds dissolve from the grounds. Too hot and you get harsh bitterness; too cool and the cup tastes flat.
- French press, pour-over dripper, or espresso machine: Each brewer extracts flavor differently. French press gives body and oils; pour-over gives clarity and brightness.
- Small measuring spoons (down to 1/8 tsp): Essential for precise spice and extract additions.
Flavor additions worth keeping on hand:
- Raw honey, cinnamon sticks, vanilla extract, peppermint extract
- Sea salt or kosher salt (fine grain dissolves faster)
- Unsweetened cocoa powder or dark chocolate chips
- Cardamom, nutmeg, and cloves for spice-forward profiles
For a deeper look at how these elements interact, the coffee flavor enhancement basics guide covers the foundational principles well.
Temperature control is especially important when you add sweeteners. Honey enhances coffee with floral and fruity notes, but you need to add it below 60°C (140°F) to preserve its beneficial enzymes and delicate aromatics. Above that temperature, those compounds break down and you lose what makes honey special.
Pro Tip: Match your honey to your roast. Acacia or clover honey pairs beautifully with light roasts because both share subtle floral qualities. For dark roasts, choose a robust wildflower or buckwheat honey that can hold its own against bold, smoky flavors.
| Tool | Why it matters | Budget option |
|---|---|---|
| Burr grinder | Even extraction | Hand crank burr grinder |
| Digital scale | Consistent ratios | Any 0.1g kitchen scale |
| Thermometer | Flavor preservation | Instant-read probe |
| Fine mesh strainer | Removes spice particles | Standard kitchen sieve |
Exploring different brewing techniques will also help you understand how your chosen brewer shapes the final flavor before you even add enhancements.
Step-by-step flavor enhancement techniques
With your ingredients and tools ready, let’s get into the actual process. These techniques are ordered from simplest to most involved, so you can start wherever feels comfortable.
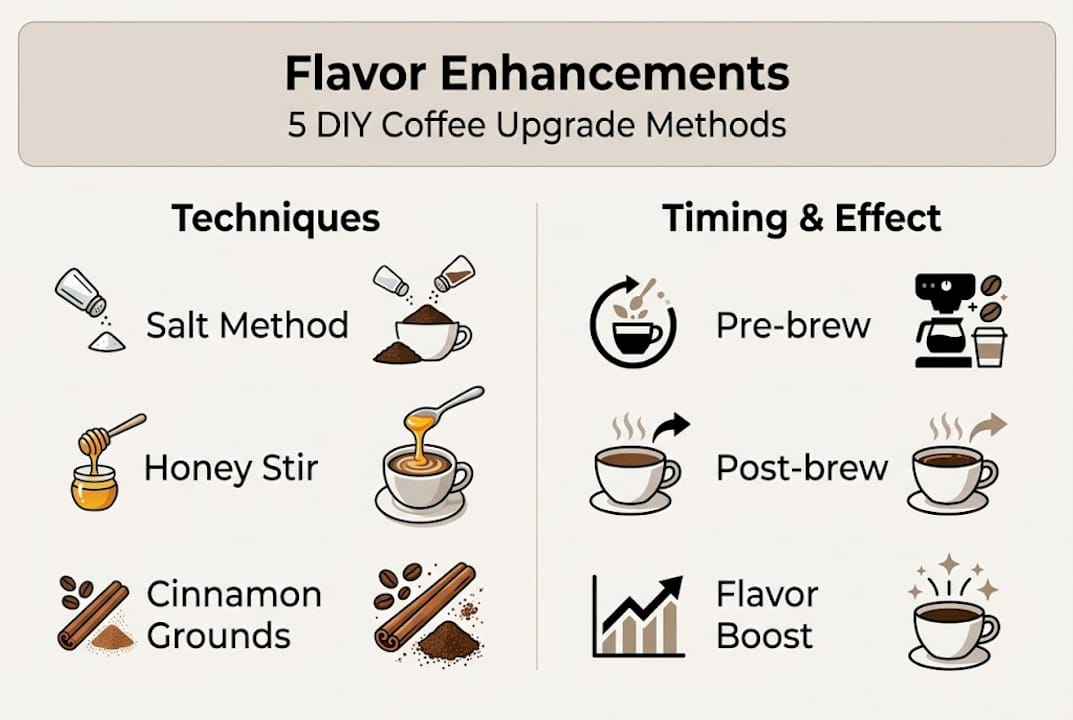
1. The salt method (bitterness reduction)
This one surprises people. Adding 0.1 to 0.3 grams of salt per 200ml of coffee suppresses bitter taste receptors on your tongue without making the cup taste salty. The result is a rounder, smoother brew. Add the salt directly to your dry grounds before brewing for the most even dispersion.
2. The honey stir-in method
Brew your coffee first, then let it cool for two to three minutes before adding honey. Stir thoroughly. Use 1 to 2 teaspoons per 200ml as a starting point and adjust from there.

3. Cinnamon in the grounds
Add 1/4 teaspoon of ground cinnamon directly to your coffee grounds before brewing. It infuses during extraction and creates a warm, spiced undertone without the grittiness of stirring it into a finished cup.
4. Vanilla extract finish
Add 1/4 teaspoon of pure vanilla extract to your brewed coffee and stir. This works especially well with medium roasts and adds a creamy, dessert-like quality.
5. Peppermint mocha (the full build)
Brew a strong coffee or espresso base. Combine 1/8 teaspoon of peppermint extract with homemade chocolate sauce (1 tablespoon cocoa powder, 1 tablespoon sugar, 1 tablespoon hot water, stirred until smooth). Add both to your coffee, top with steamed or frothed milk, and finish with a small pinch of salt.
Pro Tip: Always add salt to your dry grounds before brewing, not to the finished cup. Pre-brew dispersion is more even and the effect on bitterness is noticeably stronger.
| Enhancement | Amount per 200ml | When to add | Effect |
|---|---|---|---|
| Salt | 0.1 to 0.3g | Pre-brew (in grounds) | Reduces bitterness |
| Honey | 1 to 2 tsp | Post-brew, below 60°C | Adds floral sweetness |
| Cinnamon | 1/4 tsp | Pre-brew (in grounds) | Warm spice undertone |
| Vanilla extract | 1/4 tsp | Post-brew | Creamy, dessert notes |
| Peppermint extract | 1/8 tsp | Post-brew | Bright, cooling finish |
For more creative ideas, flavor layering techniques and spice-infused coffee guides offer excellent next steps once you have the basics down.
Timing, temperature, and the ‘flavor window’
Enhancing flavor isn’t just about ingredients. It’s also about timing and temperature. Most people drink their coffee the moment it’s poured, which is actually not the ideal moment for peak flavor.
Research shows that the optimal flavor window is 20 to 30 minutes after brewing, as your cup cools to roughly 55 to 60°C (131 to 140°F). At this temperature, volatile aromatic compounds peak, and the balance between acidity, sweetness, and bitterness is at its most harmonious. Drink it too hot and your palate is overwhelmed by heat. Wait too long and bitterness takes over as the cup cools further.
“The flavor window isn’t a suggestion. It’s the brief moment when everything in your cup is working together at once.”
Here’s how to make the most of it:
- Preheat your mug with hot water before pouring. This slows cooling and extends your window by several minutes.
- Cover your cup loosely with a small plate or lid to trap aromatics and retain heat.
- Taste at different temperatures during your first few brews to find your personal sweet spot.
- Add enhancements at the right moment: honey and extracts go in right after brewing, while spices added pre-brew are already integrated by the time you pour.
- Never reheat coffee if you can avoid it. Reheating alters the flavor profile in ways you can’t reverse and amplifies bitterness significantly.
For more strategies on elevating coffee flavor at home, and practical coffee flavor tips for enthusiasts who want to go deeper, both resources are worth bookmarking.
Understanding the flavor window also changes how you approach enhancement. If you’re adding honey or vanilla, do it at the start of the window, not at the end. The warmth helps integrate flavors, and you’ll taste the full effect while your cup is still in its prime.
Troubleshooting, common mistakes, and flavor verification
Even the best DIY efforts can go astray. Here’s how to troubleshoot and verify your flavor enhancements before you give up on a technique.
Identify what went wrong first:
- Too bitter: Over-extraction is usually the cause. Check your grind size (too fine) and brew time (too long). Salt added pre-brew can rescue an already bitter cup.
- Too sour or sharp: Under-extraction. Grind finer or increase brew time. Avoid adding citrus-forward enhancements to an already acidic cup.
- Flat or watery: Weak extraction or too much dilution from add-ins. Brew stronger before adding milk or liquid flavorings.
- Enhancement tastes artificial: You likely used too much extract. Peppermint and vanilla extracts are potent. Start at half the recommended amount and build up.
- Spice is gritty: You added ground spice post-brew. Move it to the grounds pre-brew or use a fine mesh strainer.
Pro Tip: Use a digital scale for every brew session, not just occasionally. Consistent weight measurements are the fastest way to isolate what’s working and what isn’t when you’re experimenting with new flavor combinations.
Salt is most effective for over-extracted, bitter brews. For a well-brewed cup that simply needs softening or sweetness, cream or sugar does the job more naturally.
| Problem | Likely cause | Best fix |
|---|---|---|
| Bitter | Over-extraction | Pre-brew salt, coarser grind |
| Sour | Under-extraction | Finer grind, longer brew time |
| Artificial flavor | Too much extract | Halve the extract amount |
| Gritty texture | Post-brew spice addition | Add spice to grounds pre-brew |
| Flat taste | Weak extraction | Increase coffee-to-water ratio |
For a broader look at what makes a brew genuinely complex, the coffee complexity guide is an excellent reference. And if you want to start with beans that already have strong flavor foundations, best coffees for flavor is worth a read before your next purchase.
What most guides miss: the true secret to memorable coffee flavor
Here’s what we’ve noticed after years of working with adventurous brewers: most flavor guides hand you a list of ingredients and call it done. They treat flavor enhancement like a recipe swap, as if the right extract or the right spice automatically produces a great cup.
It doesn’t work that way. The real variable is you, specifically your sensory calibration and your willingness to track what you actually experience. Flavor mastery isn’t about following a formula. It’s about building a personal log of what worked, at what temperature, with what ratio, on what kind of day.
The flavor window concept is a perfect example. It’s backed by science, but most people ignore it because it requires patience. Waiting 20 minutes feels counterintuitive when your coffee is sitting right there. But that small act of restraint consistently produces a better cup than drinking it immediately.
We also think flavor layering insights are underused. Most brewers add one enhancement and stop. The real depth comes from intentional layering, where each addition has a purpose and a place in the sequence.
Treat your home brewing like a craft, not a chore. Keep notes. Revisit your approach. The best cup you’ve ever made is probably still ahead of you.
Elevate your coffee and tea experience with Variatea
If these techniques have you thinking about what’s possible in your cup, you’re ready for the next level. At Variatea Coffee, we’ve done a lot of the flavor work for you, without sacrificing the adventure.
Our gourmet coffee flavors are crafted for enthusiasts who want bold, distinctive profiles right out of the bag. If you’re curious about aged and complex roasts, our barrel-aged coffee brings deep smoky vanilla notes that pair beautifully with the salt and honey techniques covered here. And if you want to branch out beyond coffee entirely, our curated explore teas collection offers everything from roasted Hojicha to vibrant Hibiscus Berry, each one built for the same adventurous palate you’ve been developing.
Variatea is where your DIY journey meets premium ingredients worth experimenting with.
Frequently asked questions
How much salt should I add to coffee for flavor enhancement?
Add 0.1 to 0.3 grams per 200ml of coffee to reduce bitterness without making the cup taste salty. Start at the lower end and adjust based on your roast and personal preference.
What type of honey is best for coffee and when should it be added?
Pair acacia or clover honey with light roasts and robust wildflower honey with dark roasts. Always add below 60°C to preserve the enzymes and delicate floral notes that make honey worth using.
When does coffee taste best after brewing?
Coffee flavor peaks 20 to 30 minutes post-brew as it cools to 55 to 60°C, when aromatic compounds are most active and the balance of acids and sugars is at its best.
What should I do if my enhanced coffee tastes off?
Check your ingredient ratios first, then your brewing temperature and grind size. Salt works best for over-extracted bitter brews, while cream or sugar is more effective for well-brewed cups that just need balance.
Can I reheat coffee after the flavor window passes?
Reheating alters the flavor profile irreversibly and amplifies bitterness. Your best option is to brew a fresh cup rather than reheat one that has passed its peak window.